|
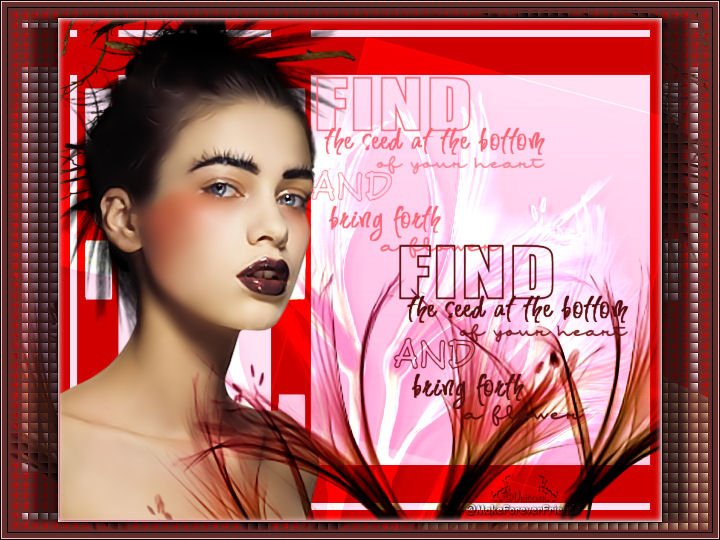
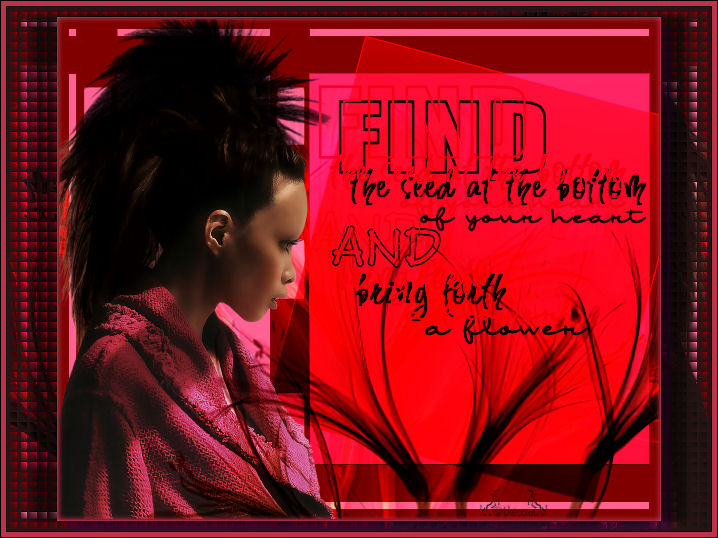
Find the Seed Blend
The original tutorial has been made by Lelanie
I'm honoured that I may translate the tutorial from her
HERE you can find the original
version
The translated version is copyright to me
Please make sure you read my
Terms of Use
I hope this tutorial is written understandable
I work with a Dutch version of psp, so I had to translate the tutorial
in similar words
It is possible that some things are written different in the English
version of PSP
This tutorial has been written in PSP 9, but is also working in other PSP
versions
ATTENTION: Are you using another version of PSP, it can be that some
things are in other places
*******
In this lesson you have to take a look what kind of colours you want to
use, because we will play alot with the colors in our work!
*******
Materials
Download the tubes, masks, selections and brushes
HERE
The brush, selection and mask is made by Lelanie
The tubes are made by MarieL
Click on the banners below to go to their websites

********
Before we start:
Put the brushes and brush tips in your map of brushes in psp
Put the selection in your selection map in psp
Open the 2 tubes AND the mask in psp
Choose a light color we going to use as our front (foreground) color
Choose a dark color as
your background color
The colors I chose:
Foreground #bf324a
Background #271415
Set your background to gradient with the following settings:

********
Step 1
Go to LelaniesMask011 and copy this one
Close the original mask (click it away)
Edit > Paste as new Picture
Step 2
Layers: open a new Raster Layer
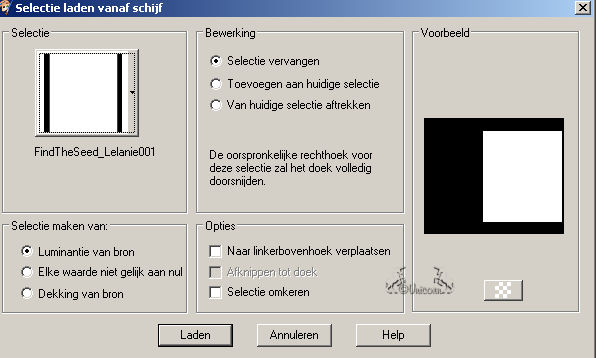
Selections - selections load from your hard disc with the following
settings:
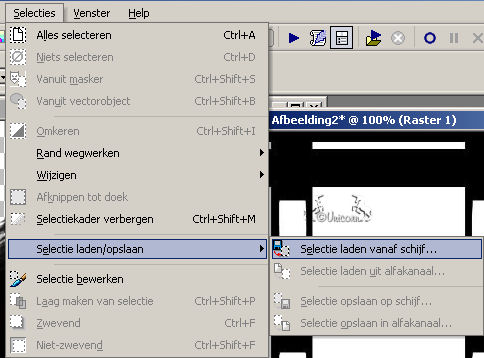
find Find the seed_Lelanie_001 and click ok
Fill the selection with your background gradient
Selections > Select none
Effects > Edge > Enhance
Step 3
Layers > New raster layer
Fill this with your light foreground color
Put the modus on "Hard Light" in your layer pallette
Move this layer 1 layer downwards
Step 4
Go to the top layer
Put the modus of this layer on "Overlay" in you layer pallette
Duplicate this layer
Go to Image > Rotate > Free rotate > 15 right > All layers unchecked
Step 5
Copy the flower and paste it as new layer
Move it downwards with your tool untill it fits nice on the bottom line
Go to Effects > 3D effects > Drop shadow with the following settings:
Vertical: 10, Horizontal: 10, Opacity: 50, Blur: 5, Color: Black
Repeat the drop shadow
Put the modus of this layer on "Soft Light" in your layer pallette
Step 6
Copy the flower tube again and paste it as a new layer
Put it like that so it fits under the other flower
Put the modus of this Layer on "Dodge" in you Layer pallette
Step 7
Copy the woman’s face and paste as new layer
Move her to the left side of you image
Duplicate the flower layer just below the woman
Layers - Arrange - Bring to top
** now the flower layer is in front of the woman layer / face **
Put the modus of this layer on "Luminance" in your layer pallette
Image > Mirror
Move the flower layer to the left bottom, or how you like it
Step 8
Layers > New raster layer
Click on your brush tool and find LelaniesBrush_findtheseed
Put your background color on COLOR, so you take it off of the gradient
Now click in the square on the right 1 time with your front color
Move your brush a little down and to the right and click 1 time with your
background color
Put the modus of this layer on "Luminance" in your layer pallette
Duplicate this layer
Put the duplicated layer on modus "Overlay"
Step 9
Go to Image > Add borders > 2 pixels with your background color
Go to Edit - Copy
Go to Image > Add borders with the following settings:
Symmetry locked out, Top: 10, Left: 50, Bottom: 10, Right: 50 > Colour:
White
Click with your magic wand in the white border
Step 10
Layers > New raster layer
Edit > Paste in selection
Image > Mirror
Selections > Promote to layer
Layers > Merge > Merge downwards
Effects > Texture effects > Blinds with the following settings:
Width: 10, Opacity: 100, Everything locked and use your background color
Repeat this but now unlock everything
Go to Effects > 3D Effects > Drop shadow with the following settings:
H and V on 0, Opacity: 100, Blur: 10, Color: a bright color out of your
picture
Repeat drop shadow
Step 11
Selections > Invert
Repeat the Drop Shadow 1 time like step 10, but put your color on black
Okay, now another drop shadow
Vertical: 0, Horizontal: 25, Opacity: 50, Blur: 10, Color: Black
Repeat Drop Shadow but now horizontal on -25
Selections > Select nothing
Go to Adjust > Sharpness > Sharpen
Step 12
Put your watermark on your tag
Image > Add borders > 1 pixel black
Image > Add borders> 5 pixels your background color
Image > Add borders > 1 pixel with the color you used as drop shadow in
step 10
Image> Add borders> 1 pixel black
Your tag is ready! save it as .JPG file
Here another version of this tutorial
|
|
I hope you had some
fun following this tutorial! It was fun translating it from Dutch
into English. I do not give permission to copy my tutorials and put
it into Word-Documents! My tutorials my not be shared in any way,
the materials must stay at all times intact and may not be shared. I can
do that myself, and the people from whom i've got my permission can to
that as well.
If you want to link to any to my tutorials, please email me for my
permission. When you are linking/copying/hotlinking anything on this site,
you'll come on the Black List and on the website of CopyCats for everyone
to see who and what you are :o)
Thank you
xxx
Mystical Beauty
2007-06-21
|